Are you ready to build a monthly budget but don’t know where to start? Well, you stumbled upon the right blog then!
I’m going to take you through the entire process of how to build a monthly budget.
Download the budget checklist for you to follow along and the budget template for you to build right from.
Now there are probably a million different ways to do a monthly budget. I’m going to show you the way that works best for our household.
You may try this for a few months and decide to tweak some things to better fit your household budget. That is great! I encourage you to build a budget that works for YOU!
First and foremost, let’s get this question out of the way. Do you work better with spreadsheets or with apps?
The app that I recommend using would be the EveryDollar Budgeting App provided by Ramsey Solutions.
Disclosure: This is not a paid advertisement; I just really like how customizable the EveryDollar app is. It also follows everything I’m about to explain in my budget template below.
I will provide screenshots on both the budget template and the EveryDollar app so everyone can follow along.
Step 1: Figure Out Your Monthly Income
First, let’s figure out what you’re working with. If you know your monthly income, then you can easily assign every dollar of that income to a category. Whereas if you start with your expenses, then you will end up doing more adjusting when you realize you may not have enough income.
If your income is the same every month, then this part will be super easy for you. Just enter your monthly income amount in either the budget template or the EveryDollar app. If you are married, then combine you and your spouse’s monthly income.
If you are married and you and your spouse have not combined your finances, please read my blog post on Why Married Couples Need to Combine Finances.
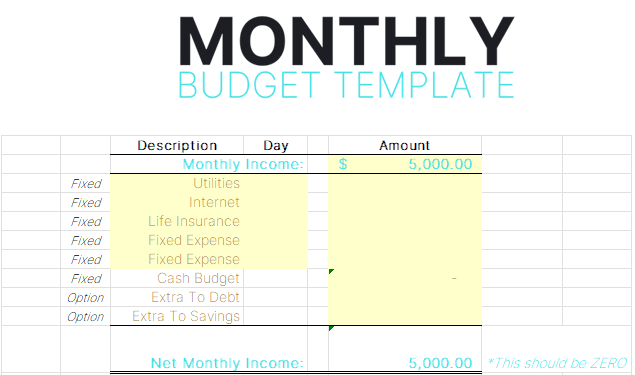

If your income fluctuates every month, then no worries! You will just have to do a little more calculation.
If you have no idea what your monthly income will be, then take your prior year’s annual income divided by 12 to get your average monthly income.
If you’re a self-employed individual take your prior year’s NET INCOME/PROFIT, not gross income divided by 12.
If you have no clue what your net income was, then check out your prior-year tax return. On Schedule C or F (if you’re a farmer), you will see Line 31 (Schedule C) or Line 34 (Schedule F), Net Profit or (Loss) will state what your net income was. If you take any depreciation on your Schedule C or F add that depreciation expense back into your Net Profit to calculate a more accurate annual income.
If you are struggling with determining your monthly income, please feel free to reach out to me and we can work through it together!
On fluctuating income, it is best to figure your average monthly income to determine a base income to work with. Then anything above that base will be extra gravy to add to your goals.
Yes, you will still assign that extra gravy to a category!
The typical categories to add your extra (non-budgeted) income to would be either extra payments to debt or your savings goals. Whichever goal you are currently at.
Step 2: Assign Your Fixed Expenses To Your Monthly Budget
Now that you know what you’re working with, it’s time to start giving that income a place to go!
The best place to start is with your fixed expenses. Fixed expenses are bills that have to be paid before anything else.
So, for example, utilities, mortgage payments, loan payments, cash budget items, etc. If you’re wondering about food, I’ve got that category covered in Cash Budget – which we will work on next!
Below is an example of monthly expenses on both the budget template and the EveryDollar app.
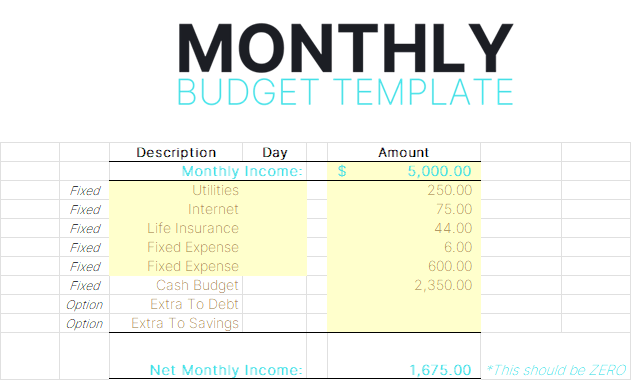

If you are working on the EveryDollar app, you will see after you click to continue that there is a place for you to enter your vehicle/transportation expenses, food/groceries expenses, personal expenses, and giving expenses.
I would recommend making these categories cash budget items. This is where the excel template may come in handy as a side reference for everyone using the EveryDollar app.
In my example above, you will see that I have $600 going to Vehicle Checking. My husband and I have a separate checking account for vehicle expenses. If you’d like to learn more about how we organize our finances, take a look at my blog post on 7 Tips To Be Financially Organized.
Step 3: Establish Your Cash Monthly Budget
If you’re working in the EveryDollar app, you can incorporate the budget template for your cash budget section.
This section is basically anything that you can pay cash with.
You’ve all probably heard of the envelope system; well, I am a BIG believer in it. Paying with cash HURTS.
It’s also easier to physically see and feel how much money you have left for the month, instead of swiping a card and looking at it electronically. The impact cash leaves is much greater than a card.
Some categories that I recommend having here include groceries, clothes, giving/tithing, gas (if you don’t have a separate vehicle account), meals (eating out), etc.
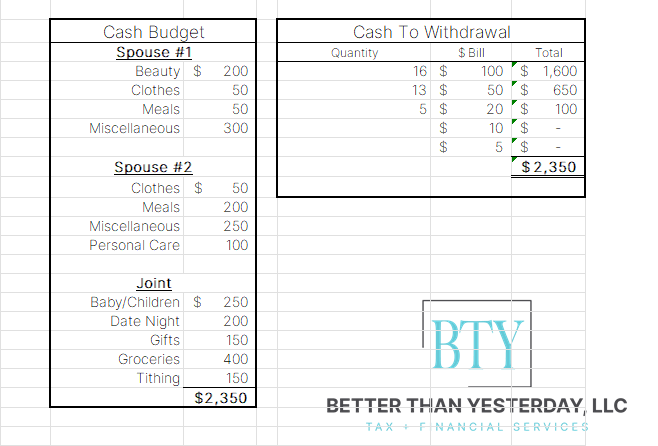
You’ll notice in my example, that I have both “gifts” and “tithing”. We differentiate these in our household because we consider “gifts/giving” as random gifts for weddings, birthdays, sympathy, etc. Whereas with tithing we consider that to be church and charitable donations.
Again, you can design your budget the way it best suits your family. This is just what we like to do!
After you determine your cash budget, you will see that there is a cash withdrawal section on the budget template. This is something I use every month to help me decide how many of each bill I need to withdraw. You can always switch this up.
For example, my husband just told me that he’d rather have more 20s than 100s because he’s always needing to break bills.
If you are married, you will see that there is a section for your cash, your spouses, and your joint cash expenses. If you are doing a cash budget as a single person you can combine those sections.
Okay, I know what you are all thinking now. How will I organize this envelope system? I got you covered. Below are a couple of options that we’ve enjoyed using!


Step 4: Recognize Your Random Annual Expenses
Be sure to keep in mind all of your random annual expenses. The budget template has a tab for you to organize all of your random annual expenses. So, that you can be sure to budget for them in the appropriate month.
If you are using the EveryDollar app, you can still use the budget template to organize these annual expenses.
Once you get to a month with an annual expense, you will just enter that expense into your monthly budget!
See the budget template example below

Step 5: Put The Rest Towards Your Goal
Now, this is the fun part!
Where are you at in your goals?!
Are you still paying off your debt? Great! You should be working on paying off your debts from smallest to largest. To read more on paying off debt, head over to my blog post on How To Pay Off Debt.
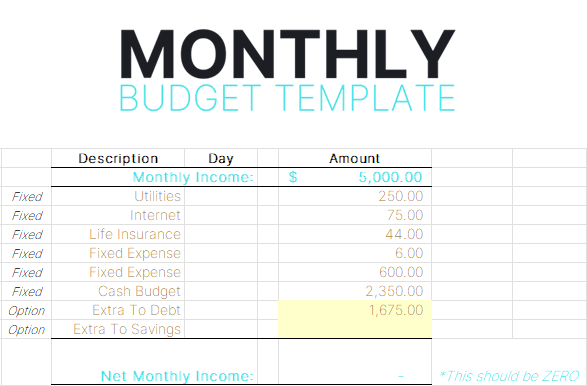
The extra income that you do not have categorized will go towards paying off your smallest debt first. In the example below, you’d have an extra $1,675 to use in addition to your monthly minimum payments.

Are you debt-free?! Even better!! What are your savings goals? Are you saving for a house? A baby? A new vehicle? Whatever your goal may be, then throw that extra money towards it!
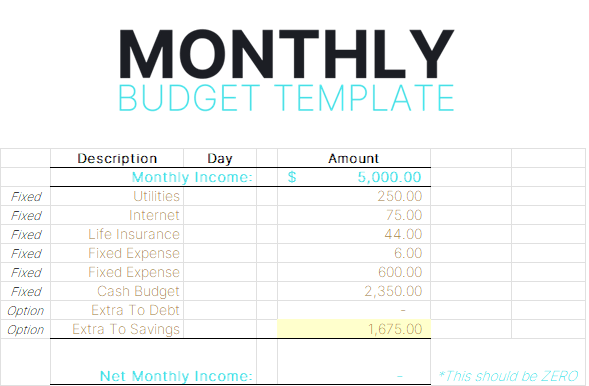

You should zero out your budget every month. This means you have assigned every dollar of your income to a category.
Remember, you are being intentional with your money. Which is the whole purpose of assigning every dollar a place.
This is YOUR budget. So, be realistic.
Don’t set yourself up for failure by setting unachievable amounts. A budget should not feel constricting, it should be freeing.
Hopefully, these steps help you start to build your monthly budget.
It’s okay to not perfect your budget the very first time. It is a work in progress and there is ALWAYS room for improvement. You just have to focus on making it better than yesterday!
Follow along for more budgeting tips!
All videos are made with Animaker, sign up for free today!
